
| Stateflow |   |
The Explorer displays any defined events, data, and targets within an object hierarchy where machines, charts, and states are potential parents.
You can create, modify, and delete events, data, and target objects using the Explorer. You can also add events, data, and targets using the graphics editor Add menu. (See Defining Events for more information.) If you add data or events via the Add menu, the chart is automatically defined as the parent. If you add a target, the machine is defined as the parent. Targets can only be parented by the machine. If you want to change the parent of a data or event object, you must use the Explorer to do so. Similarly you must use the Explorer if you want to delete an event, data, or target object.
Explorer Main Window
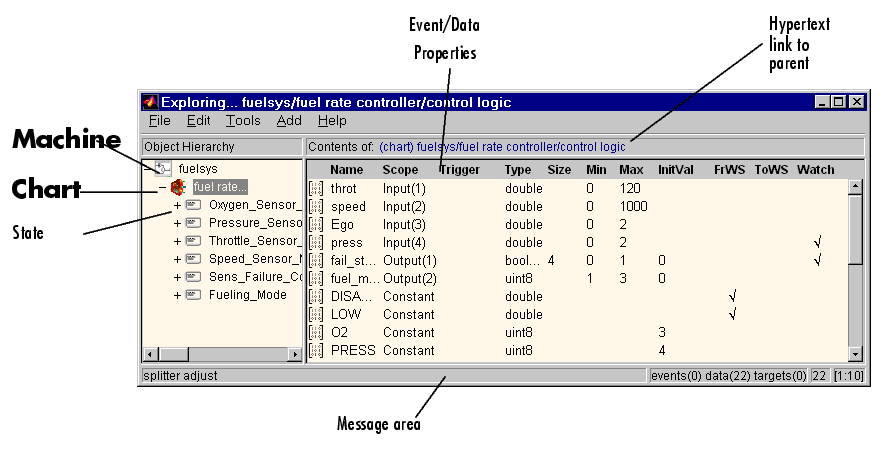
This is the Explorer main window showing the object hierarchy of an example chart (explore_ex).

Object Hierarchy
The Object Hierarchy (machines, charts, and states) is displayed in the left-hand pane. A `+' character indicates that the hierarchy can be expanded by double-clicking on that entry (or by clicking on the `+' character. A `-' character indicates there is nothing to expand. Clicking on an entry in the Object Hierarchy selects that entry.
Contents Pane
Data, and target objects parented by the currently selected object in the Object Hierarchy are displayed in the Contents pane. Each type of object has an icon. The entry for a data object displays selected properties of the object.
These are the possible parent and object combinations.
| Machine |
Chart |
State |
|
| Event |
yes |
yes |
yes |
| Data |
yes |
yes |
yes |
| Target |
yes |
no |
no |
Targets are parented exclusively by machines. (Although all other combinations are valid, there are guidelines describing how Scope affects choice of parent and vice-versa.) The default sfun simulation target is automatically defined for every machine. If you have a Real-Time Workshop license, a Real-Time Workshop target is also automatically added:
See Configuring a Target for information on customizing the simulation target. See Adding a Target to a State Machine's Target List for information on creating targets to generate code using the Stateflow Coder product.
For convenience, a hypertext link to the parent of the currently selected object in the Object Hierarchy is included following the Contents of: label. Click on the hypertext link to bring that object to the forefront.
Moving Objects/Changing Parent
To create desired behavior you may need to change the parent of an event, data, or target object.
Objects in the Contents of: pane can be moved in the hierarchy to change an object's parent. Click and drag an object from the Contents of: pane to a new location in the Object Hierarchy pane to change its parent. If the object is the current parent, an X with a circle around it is displayed (indicating this is an invalid operation). If you move an object to a level in the hierarchy that does not support that object's current Scope property, the Scope is changed to Local.
Moving Objects/Changing Index and Port Order
To ensure proper ordering of event and/or data Input from or Output to Simulink you may need to move some of these objects in the Explorer.
Click and drag a data object with Input from or Output to Simulink Scope to a new position in the Contents of: pane Data list to change its port number. Click and drag an event Input from or Output to Simulink Scope to a new position in the Contents of: pane Event list to change its index number.
Deleting Objects
Select the object in the Contents of: pane and press the Delete key or select Cut (Ctrl+X) from the Edit menu to delete an object.
Editing Objects
To edit a state or chart displayed in the Explorer's Object Hierarchy pane, select the object, display its context menu by clicking the right mouse button, and select Edit from the context menu. Stateflow displays the selected object in the Stateflow editor.
Setting Properties
To set an object's properties, select it in the Object Hierarchy or Contents pane and then select Properties from the Explorer's Edit or context menu.
Renaming Objects
To rename an event or data item, double click the object's name in the Contents pane. An edit field containing the name appears. Edit the name in the edit field and then click anywhere outside the edit field to apply the changes.
Transferring Object Properties
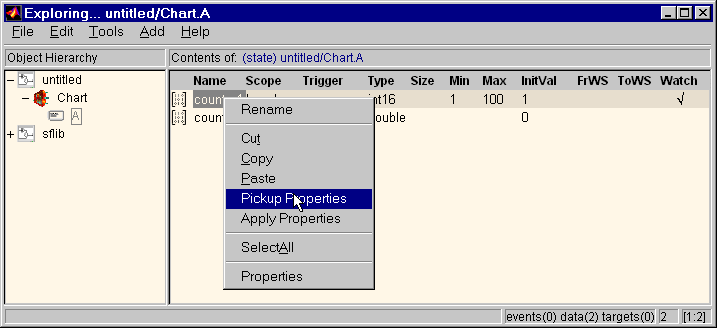
The Explorer allows you to transfer the properties of one object to another object or set of objects.
To transfer an object's properties:


Stateflow applies the copied properties to the selected object(s).

 | Exploring and Searching Charts | Searching Charts |  |