| Real-Time Workshop User's Guide | |
Tutorial 1: Building a Generic Real-Time Program
This tutorial walks through the process of generating C code and building an executable program from the demonstration model. The resultant stand-alone program runs on your workstation, independent of external timing and events.
Working and Build Directories
It is convenient to work with a local copy of the f14 model, stored in its own directory, f14example. This discussion assumes that the f14example directory resides on drive d:. Set up your working directory as follows:
or
!mkdir ~/f14example (on UNIX)
The model appears in the Simulink window.
f14 modeld:/f14example/f14rtw.mdl.
Be aware that during code generation, the Real-Time Workshop creates a build directory within your working directory. The build directory name is model_target_rtw, derived from the name of the source model and the chosen target. The build directory stores generated source code and other files created during the build process. We examine the build directory and its contents at the end of this tutorial.
Setting Program Parameters
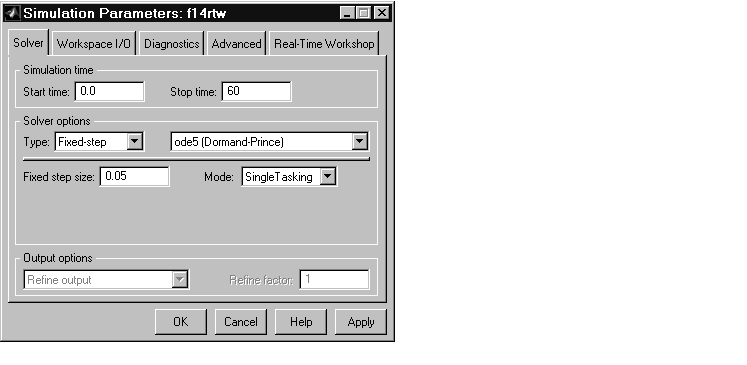
To generate code correctly from the f14rtw model, you must change some of the simulation parameters. In particular, note that the Real-Time Workshop requires the use of a fixed-step solver. To set parameters, use the Simulation Parameters dialog box as follows:
Start Time: 0.0
Stop Time: 60
Solver options: set Type to Fixed-step. Select the ode5 (Dormand-Prince)
solver algorithm.
Fixed step size: 0.05
Mode: Single Tasking
Figure 1-9 shows the Solver page with the correct parameter settings.
Figure 1-9: Solver Page of Simulation Parameters Dialog Box
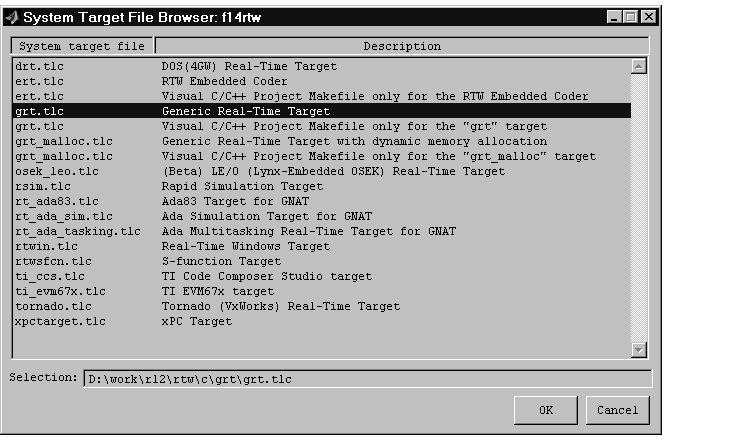
Selecting the Target Configuration
To specify the desired target configuration, you choose a system target file, a template makefile, and a make command.
In these tutorials, you do not need to specify these parameters individually. Instead, you use the ready-to-run generic real-time (GRT) target configuration. The GRT target is designed to build a stand-alone executable program that runs on your workstation.
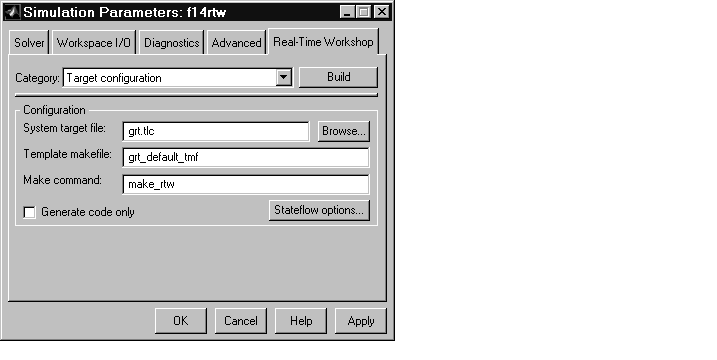
Figure 1-10: Real-Time Workshop Page (Target Configuration Category)
make command.
Figure 1-11: The System Target File Browser
grt.tlc), template makefile (grt_default_tmf), and make command (make_rtw), as in Figure 1-10.

Building and Running the Program
The Real-Time Workshop build process generates C code from the model, and then compiles and links the generated program. To build and run the program:
### Starting Real-Time Workshop build procedure for model: f14rtw### Generating code into build directory: .\f14rtw_grt_rtw
The content of the succeeding messages depends on your compiler and operating system.The final message is
### Successful completion of Real-Time Workshop build procedure
for model: f14rtw
f14rtw.exe (on PC), or f14rtw (on UNIX). In addition, a build directory, f14rtw_grt_rtw, has been created.
To observe the contents of the working directory after the build, type the dir
command from the MATLAB command window.
dir
.              f14rtw.exe     f14rtw_grt_rtw
..             f14rtw.mdl
The "!" character passes the command that follows it to the operating
system, which runs the stand-alone f14rtw program.
The program produces one line of output.
**starting the model**
Contents of the Build Directory
The build process creates a build directory and names it model_target_rtw, concatenating the name of the source model and the chosen target. In this example, the build directory is named f14rtw_grt_rtw.
f14rtw_grt_rtw contains these generated source code files:
f14rtw.c -- the stand-alone C code that implements the model.f14rtw.h -- an include header file containing information about the state variablesf14rtw_export.h -- an include header file containing information about exported signals and parametersThe build directory also contains other files used in the build process, such as the object (.obj) files and the generated makefile (f14rtw.mk).
| | Getting Started: Basic Concepts and Tutorials | Tutorial 2: Data Logging | |