

| Real-Time Workshop User's Guide | |
Code Validation
After completing the build process, the stand-alone version of the countersdemo model is ready for comparison with the Simulink model. The data logging options selected with the Workspace I/O page of the Simulation Parameters dialog box cause the program to save the control signal, enabled counter, triggered counter, and simulation time. You can now use MATLAB to produce plots of the same data that you see on the three Simulink scopes.
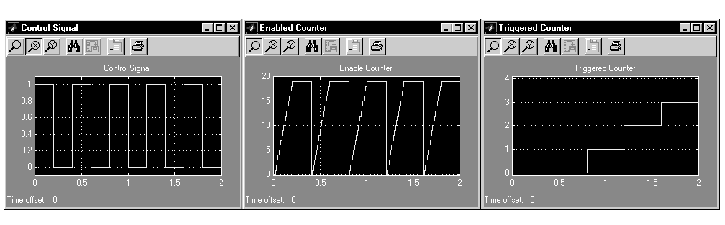
In both the Simulink and the stand-alone executable version of the countersdemo model, the control input is simulated with a discrete-pulse generator producing a 10 Hz, fifty percent duty cycle waveform.
Open the control signal, enabled counter, and triggered counter scopes. Running the Simulink simulation from T=0 to T=2 produces these outputs.
Type who at the MATLAB prompt to view the variable names from Simulink simulation.
who

Your variables are:
Enable_Signal       Triggered_Counter
Enabled_Counter     tout
Now run the stand-alone program from MATLAB.
!countersdemo
The "!" character passes the command that follows it to the operating system. This command, therefore, runs the stand-alone version of countersdemo (not the M-file).
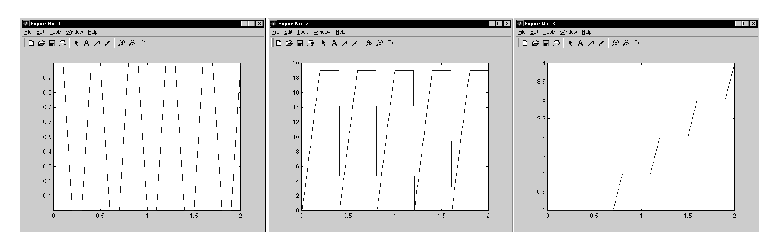
To obtain the data from the stand-alone program, load the file countersdemo.mat.
load countersdemo
Then look at the workspace variables.
who
Your variables are:
Enable_Signal                 rt_Triggered_Counter
Enabled_Counter               rt_tout
Triggered_Counter             tout
rt_Enable_Signal
rt_Enabled_Counter
The stand-alone Ada program prepends rt_ to the logged variable names to distinguish them from the variables Simulink logged.
You can now use MATLAB to plot the three workspace variables as a function of time.
plot(rt_Enable_Signal(:,1),rt_Enable_Signal(:,2))
figure
plot(rt_Enabled_Counter(:,1),rt_Enabled_Counter(:,2))
figure
plot(rt_Triggered_Counter(:,1),rt_Triggered_Counter(:,2))
| | Signal Properties | Analyzing Data with MATLAB | |