| Image Processing Toolbox | |
Intensity Adjustment
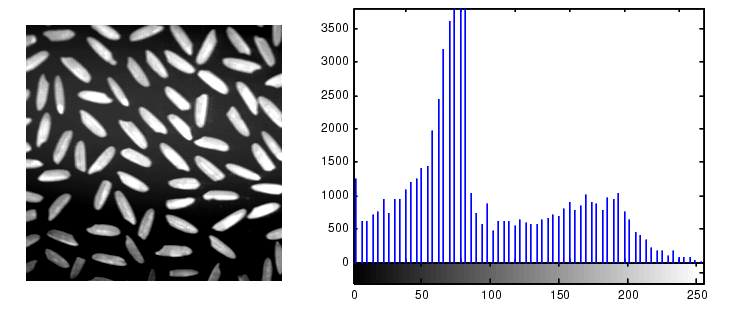
Intensity adjustment is a technique for mapping an image's intensity values to a new range. For example, look at rice.tif. It is a low contrast image. If you look at a histogram of rice.tif in Figure 8-4, it indicates that there are no values below 40 or above 255. If you remap the data values to fill the entire intensity range [0, 255], you can increase the contrast of the image.
You can do this kind of adjustment with the imadjust function. For example, this code performs the adjustment described above.
I = imread('rice.tif');
J = imadjust(I,[0.15 0.9],[0 1]);
With the two vectors supplied, imadjust scales pixel values of 0.15 to 0 and 0.9 to 1. Notice that the intensities are specified as values between 0 and 1 regardless of the class of I. If I is uint8, the values you supply are multiplied by 255 to determine the actual values to use; if I is uint16, the values are multiplied by 65535.
Now display the adjusted image and its histogram.
imshow(J)
figure, imhist(J,64)
Figure 8-6: Rice.tif After an Intensity Adjustment and a Histogram of Its Adjusted Intensities
Notice the increased contrast in the image, and that the histogram now fills the entire range.
Similarly, you can decrease the contrast of an image by narrowing the range of the data, as in this call.
J = imadjust(I,[0 1],[0.3 0.8]);
J = imadjust(I,[low high],[bottom top])
where low and high are the intensities in the input image, which are mapped to bottom and top in the output image.
In addition to increasing or decreasing contrast, you can perform a wide variety of other image enhancements with imadjust. In the example below, the man's coat is too dark to reveal any detail. The call to imadjust maps the range [0,51] in the uint8 input image to [128,255] in the output image. This brightens the image considerably, and also widens the dynamic range of the dark portions of the original image, making it much easier to see the details in the coat.
I = imread('cameraman.tif');
J = imadjust(I,[0 0.2],[0.5 1]);
imshow(I)
figure, imshow(J)
Figure 8-7: Cameraman.tif Before and After Remapping, and Widening its Dynamic Range
Notice that this operation results in much of the image being washed out. This is because all values above 51 in the original image get mapped to 255 in the adjusted image.
Gamma Correction
imadjust maps low to bottom, and high to top. By default, the values between low and high are mapped linearly to values between bottom and top. For example, the value halfway between low and high corresponds to the value halfway between bottom and top.
imadjust can accept an additional argument which specifies the gamma correction factor. Depending on the value of gamma, the mapping between values in the input and output images may be nonlinear. For example, the value halfway between low and high may map to a value either greater than or less than the value halfway between bottom and top.
Gamma can be any value between 0 and infinity. If gamma is 1 (the default), the mapping is linear. If gamma is less than 1, the mapping is weighted toward higher (brighter) output values. If gamma is greater than 1, the mapping is weighted toward lower (darker) output values.
The figure below illustrates this relationship. The three transformation curves show how values are mapped when gamma is less than, equal to, and greater than 1. (In each graph, the x-axis represents the intensity values in the input image, and the y-axis represents the intensity values in the output image.)
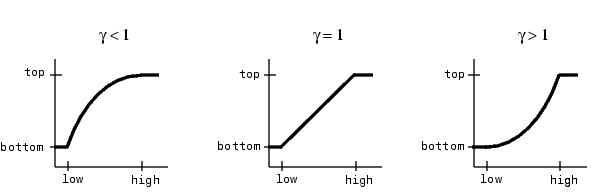
Figure 8-8: Plots Showing Three Different Gamma Correction Settings
The example below illustrates gamma correction. Notice that in the call to imadjust, the data ranges of the input and output images are specified as empty matrices. When you specify an empty matrix, imadjust uses the default range of [0,1]. In the example, both ranges are left empty; this means that gamma correction is applied without any other adjustment of the data.
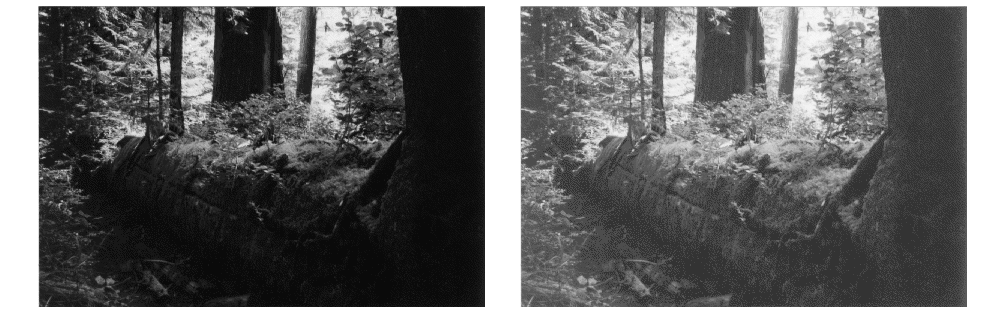
[X,map] = imread('forest.tif')
I = ind2gray(X,map);
J = imadjust(I,[],[],0.5);
imshow(I)
figure, imshow(J)
Figure 8-9: Forest.tif Before and After Applying Gamma Correction of 0.5
Histogram Equalization
The process of adjusting intensity values can be done automatically by the histeq function. histeq performs histogram equalization, which involves transforming the intensity values so that the histogram of the output image approximately matches a specified histogram. (By default, histeq tries to match a flat histogram with 64 bins, but you can specify a different histogram instead; see the reference page for histeq.)
This example illustrates using histeq to adjust an intensity image. The original image has low contrast, with most values in the middle of the intensity range. histeq produces an output image having values evenly distributed throughout the range.
I = imread('pout.tif');
J = histeq(I);
imshow(I)
figure, imshow(J)
Figure 8-10: Pout.tif Before and After Histogram Equalization
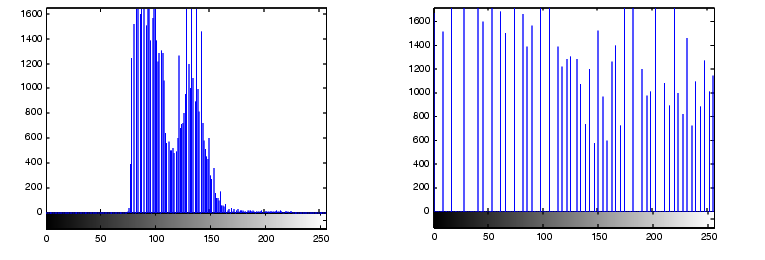
The example below shows the histograms for the two images.
figure,imhist(I)
figure, imhist(J)
Figure 8-11: Histogram Before Equalization (left) and After Equalization (right)
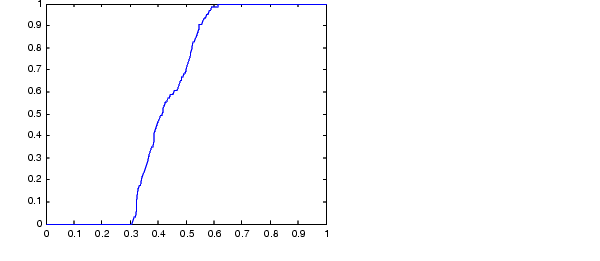
histeq can return an additional 1-by-256 vector that shows, for each possible input value, the resulting output value. (The values in this vector are in the range [0,1], regardless of the class of the input image.) You can plot this data to get the transformation curve. For example,
I = imread('pout.tif');
[J,T] = histeq(I);
figure,plot((0:255)/255,T);
Notice how this curve reflects the histograms in the previous figure, with the input values being mostly between 0.3 and 0.6, while the output values are distributed evenly between 0 and 1.
For an interactive demonstration of intensity adjustment, try running imadjdemo.
| | Image Enhancement | Noise Removal | |