
| Dials & Gauges Blockset | |
About the Dials & Gauges Blockset
The Dials & Gauges Blockset supplies realistic, instrument-like user interface controls for Simulink® blocks.
Model-Based Instrumentation
The Dials & Gauges Blockset provides you with model-based instrumentation, which allows you to add graphical instruments directly to your model, using them as you would use blocks from the Sources and Sinks libraries.
Real-Time Workshop Support
You can use Real-Time Workshop® 4.0 or later to generate code from models that include Dials & Gauges Blockset blocks.
External Mode Support
The Dials & Gauges Blockset support for external mode allows you to incorporate dials and gauges into any target that you can connect to through external mode (e.g., the xPC Target and Real-Time Windows Target environments; see the documentation for those products for details).
For More Information
This chapter helps you get a quick start for working with the Dials & Gauges Blockset by illustrating how to use model-based instrumentation in a simple Simulink model.
Simulink Block Diagrams and Active X Control Blocks
Before using ActiveX Control blocks with Simulink models, it is important to read this section to understand differences between using Simulink and using ActiveX Control blocks.
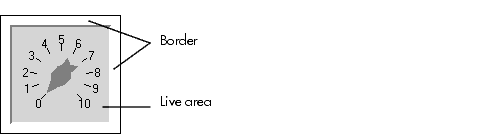
Selecting and Moving an ActiveX Control Block
To select an ActiveX Control block, click on its border. Once the ActiveX control has been created, the ActiveX Control block has a border and a "live" area within the border. This live area is the ActiveX control. To move a block, you must drag the block by the border, not the live area. This figure shows an ActiveX Control block and indicates the border.
Printing Limitation
The live areas of ActiveX Control blocks do not print with this release of the blockset. When you print a Simulink block with an ActiveX control, you will just see the outline of the block.
| A Sample Model | |