

| Getting Started | |
Adding Poles and Zeros to the Compensator
You may have noticed that increasing the gain makes the system underdamped. Further increases force the system into instability, so meeting the design requirements with only a gain in the compensator is not possible.
There are three sets of parameters that specify the compensator: poles, zeros, and gain. Once you have selected the gain, you can add poles or zeros to the compensator.
Adding Poles to the Compensator
Try adding a complex conjugate compensator pole pair on the root locus plot:
This figure shows these two steps.

Figure 4-28: Adding a Complex Pair of Poles to the Compensator
Try placing the `x' somewhere to the left of the complex pole pair near the imaginary axis (the figure above shows a good spot). Once you have added the complex pair of poles, the LTI Viewer response plots change and both the root locus and Bode plots display the new poles. This figure shows the SISO Design Tool with the new poles added. For clarity, you may want to zoom out further, as was done here.

Figure 4-29: The Result of Adding a Complex Pair of Poles to the Compensator
Adding Zeros to the Compensator
The procedure for adding zeros to the compensator is exactly the same. Try adding a pair of complex zeros just to the left of complex closed-loop poles you just added to the compensator. This figure shows the results.
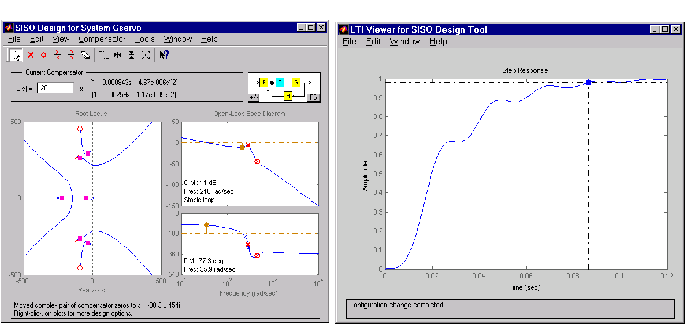
Figure 4-30: Electrohydraulic Servomechanism Example with Complex Zeros Added
If your step response is unstable, lower the gain by grabbing a red box in the right-hand plane and moving it into the left-half plane. In this example, the resulting step response is stable, but it still doesn't meet the design criteria since the 2% settling time is greater than 0.05 second.
As you can see, the compensator design process can involve some trial and error. You can try dragging the compensator poles, compensator zeros, or the closed-loop poles around the root locus until you meet the design criteria
The next section shows you how to place poles and zeros by specifying their numerical values. It also presents a solution that meets the design specifications for the servomechanism example.
Viewing Damping Ratios
If you want to place, for example, a pair of complex poles on your diagram at a particular damping ratio, select Design Constraints from the right-click menu in the root locus. This opens the Design Constraints editor.
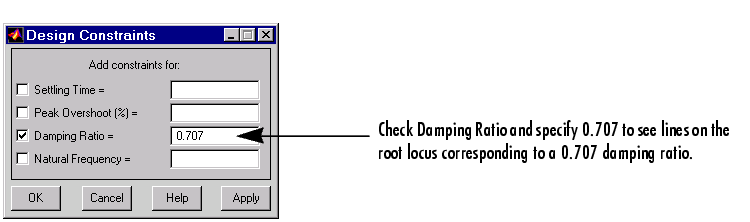
Figure 4-31: The Design Constraints Editor
Applying damping ratios to the root locus plot results in a pair of lines at the desired slope, as this figure shows.
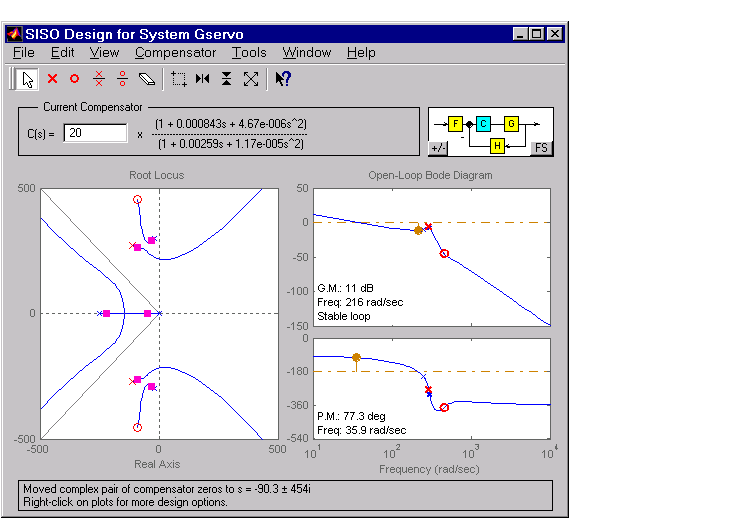
Figure 4-32: Root Locus Displaying 0.707 Damping Ratio Lines
Try moving the complex pair of poles you've added to the design so that they are on the 0.707 damping ratio line. You can experiment with different damping ratios to see the effect on the design.
| | Changing the Compensator Gain | Editing Compensator Pole and Zero Locations | |