| Communications Blockset |
  |
Building the Model
This section helps you build the model starting from a blank model window. If you prefer to open the prebuilt model, then type commblksgettingstarted at the MATLAB prompt and skip ahead to Exploring the Model.
Part 1: Placing the First Block
To start building the model, follow these steps:
- Type
commlib at the MATLAB prompt. This opens the Communications Blockset main library.
- From the library's File menu, select New and then select Model. This opens a new model window called
untitled. You will build the example model in this window.
- From the model window's File menu, select Save. Choose an appropriate location and filename for the model you are about to build. You should save the model frequently while you are editing it, to avoid losing any work.
- In the Communications Blockset main library, double-click on the Comm Sources icon. This opens the Comm Sources library.
- In the Comm Sources library, find the icon for the Bernoulli Random Binary Generator block. Drag it into the model window.
- In the model window (not the Comm Sources library window), double-click on the Bernoulli Random Binary Generator icon. This opens the block's parameter dialog box, also called its mask.
- In the mask, type new values in the parameter fields to change the default parameter values to the ones shown in the right image below.
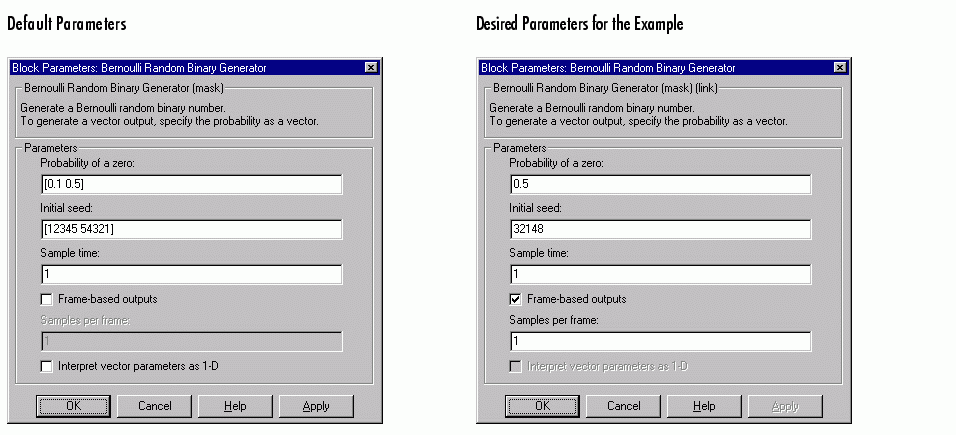
- Click on the OK button in the mask.
You have now placed and configured the first block for this example model.
Part 2: Placing Other Blocks
This section tells how to find and configure the other blocks required for the example model. First open the main libraries of the products that contain those blocks:
- To open the main DSP Blockset library, type
dsplib at the MATLAB prompt.
- To open the main Simulink library, type
simulink3 at the MATLAB prompt.
Now, the basic procedure for placing blocks is similar to the procedure you used for the Bernoulli Random Binary Generator block:
- From the product's main library, navigate to the library or sublibrary where the block resides.
- Drag the desired block into the model window.
- Double-click on the block in the model window to open its mask.
- Change the appropriate parameters.
- Click on the mask's OK button.
Apply this basic procedure to the blocks listed below. For now, just place each block anywhere within your model window. The next section gives tips for connecting the blocks to each other.
Below are the blocks that you should gather and configure in your model window. Each bullet lists the name and library location of the block, while each subbullet indicates how to change the parameters from their default values.
From the Communications Blockset Library.
- Convolutional Encoder, from the Convolutional sublibrary of the Channel Coding library. Use default parameter values.
- BPSK Modulator Baseband, from the PM sublibrary of the Digital Baseband sublibrary of the Modulation library. Use default parameter values.
- AWGN Channel, from the Channels library
- Set Initial seed to
123456
- Set Es/No to
-1
- Set Symbol period to
.5
- Sampled Quantizer Encode, from the Source Coding library
- Set Quantization partition to
[-.75 -.5 -.25 0 .25 .5 .75]
- Set Quantization codebook to
[7 6 5 4 3 2 1 0]
- Set Input signal vector length to
1
- Set Sample time to
-1
- Viterbi Decoder, from the Convolutional sublibrary of the Channel Coding library
- Set Decision type to Soft Decision
- Set Number of soft decision bits to
3
- Set Traceback depth to
48
- Error Rate Calculation, from the Comm Sinks library
- Set Receive delay to
49
- Set Output data to Port
From the DSP Blockset Library.
- Unbuffer, from the Buffers sublibrary of the Signal Management library. Use the default parameter value.
- Buffer, from the Buffers sublibrary of the Signal Management library
- Set Output buffer size to
2
From the Simulink Library.
- Complex to Real-Imag, from the Math library
- Two copies of Terminator, from the Signals & Systems library
- Display, from the Sinks library
- Use default parameter values, but drag a corner of the icon to make it three times as tall
Connecting the Blocks
Once you have all the blocks in your model window, you can connect them so that your model window looks like Example Model (except for the Info block that appears in that figure). Also, from the model window's Simulation menu, choose Simulation parameters; then in the Simulation Parameters dialog box, set Stop time to inf.
Here are some tips for connecting blocks:
- To connect the output port of one block to the input port of another block, position the pointer over the first block's output port and drag the pointer to the second block's input port.
- To add a branch to an existing connection line (for example, to connect the Bernoulli Random Binary Generator block to both the Convolutional Encoder block and the Error Rate Calculation block), first position the pointer on the line where you want the branch to start. Then using the right mouse button, drag the pointer to the place where you want the branch to end. As an alternative to using the right mouse button, you can also use the left mouse button while holding down the Ctrl key.
- To delete a connection line, first select it by positioning the cursor along the line and pressing the mouse button. Then select Cut from the model window's Edit menu.
- To undo the addition or deletion of a block or line, choose Undo from the model window's Edit menu. You can also reverse the effect of an Undo command by using the Redo option from the model window's Edit menu.
- To reverse the orientation of a block's icon, select the block and choose Flip block from the model window's Format menu. To rotate a block's icon, select the block and choose Rotate block from the model window's Format menu.
Additional information about modelbuilding is in the section, "Creating a Model," in the Using Simulink guide.
| | Overview of the Simulation | | Exploring the Model | |